Showing posts with label Tutorials. Show all posts

Thursday, July 24, 2014

From Overalls to Dress: A DIY Sewing Tutorial


Have you ever purchased an outfit for your kids that you thought would just look the cutest on them only to find that it was defective or they only got to wear it once or twice before they outgrew it?  I seem to have this problem with overalls quite often.  So much so that I pretty much quit buying them for my kids until now.  My oldest daughter who is now ten by the way, received the cutest outfit with overalls when she was a baby, that I could never quite bring myself to part with, even though it was defective.  The little snaps up and down the inside of the legs to make diaper changes easy never stayed closed properly.  Every time she wore these cute pants the legs opened after less than 30 seconds of wear time.  So I tucked them into my mending pile and promised myself I would figure out how to fix them someday.  Well, she outgrew them and her sister missed out on them completely and the years passed as they got pushed aside again and again every time I tackled my mending pile.
Now that my youngest and last little girl has arrived and is growing so quickly I realize that it is now or never for these cute little overalls.  The inspiration for this project came from my sister-in-law Meggan who gave my older girls up-cycled dresses similar to this a couple of years ago.  Remembering those outfits gave me the idea I needed to pass along this little DIY sewing tutorial to you.

Supplies You’ll Need:
1 pair of overalls either shorts or pants will work
cotton/blend print fabric to match your overalls design if it has any (I tried to match the embroidery colors and design on mine)
cutting mat, ruler and rotary cutter
matching thread
jeans sewing needle 80/12 size
Pellon 806 Stitch-N-Tear 20″ wide – White
pencil and sharpie marker
general sewing supplies


Step 1:  Fold your overalls in half and cut carefully with a rotary cutter.  I cut my pair low enough to save the fancy pocket design and the inner pockets themselves.

Step 2:  Lay flat and trim any uneven spots off.


Step 3:  Lay out your stitch-n-tear panel.  I buy mine by the yard so I have it large enough to make pattern pieces with, it’s fairly inexpensive and holds up better than the tissue that comes in normal patterns.  If it has issues laying flat for you, iron it to remove any folds, bends and wrinkles.  Unfold and lay your pant legs flat on your stitch-n-tear panel.  Then outline the pants with a pencil.  Add a 1/2″ seam allowance to both sides of the outline and go over the pencil lines with a black sharpie.
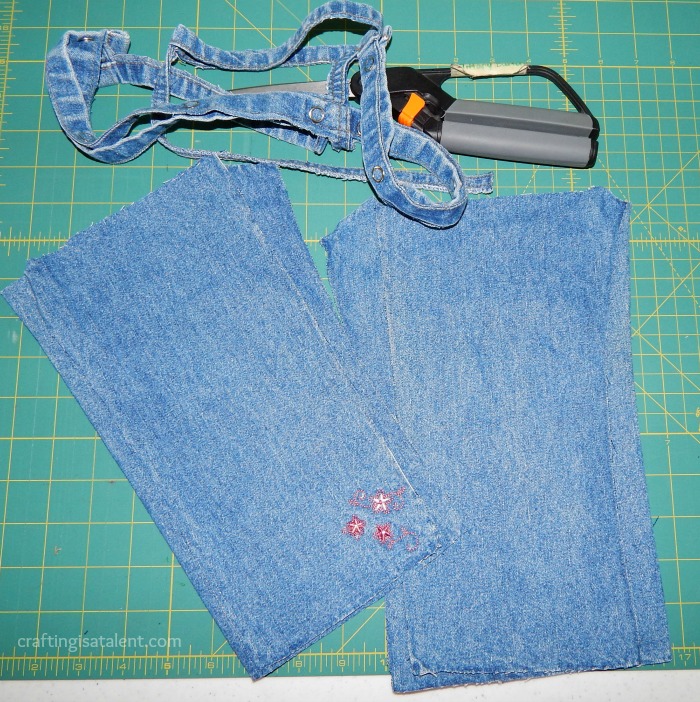

Step 4:  Cut the seams off the legs you just removed and straighten them.  I cut mine to 4in. x 11in.  I did this so I could add a cute ruffle to the bottom of the dress and so I could save the matching embroidery design from the pant leg.  If you don’t want a ruffle this step and step five could be skipped.  I wanted to save the cute little flowers embroidered at the bottom of the pant legs.


Step 5:  Sew the leg sections end to end until you have a nice jean circle with a thread color matching the jeans as well as you can.  I use a jeans needle for this entire project.  They are excellent at getting through the thicker fabric and will save your project and your sewing needles from breakage and frustration.  Sew with an over-lock seam along the edge to prevent fraying.  The over-lock stitch is number eight on my machine  I have a picture of it for you so you know what the stitch looks like.  Press seams to one side.


Step 6:  Zigzag or over-lock stitch the very bottom edge of your jean circle.  I adjusted my stitch width to 3 inches in order to save my embroidery.  Then fold it 1/8-1/2″ to the inside and hem.  This will be the bottom hem of your skirt.  If you aren’t trying to save a design like I was you can give yourself a larger hem allowance.

Step 7:  About 1/4″ in. from the upper edge of your jean circle baste a long running stitch all the way around.  To do this simply change the stitch length on your straight stitch to as long as it will go on your machine.  My machine will lengthen this stitch to 5″ inches.  Do a second one 1/4″ in. away from the first one.  Be sure not to lock in or reverse stitch your start and finish on these two seams because you will be using them to create the gathers in your ruffle.


Step 8:tear pattern and put on a dashed line for the ruffle adjustment.  Next pick a patterned fabric to match your pants design or that looks cute with your overalls.  I picked colors to match the accent flowers on the overalls.  Lay the pattern on the fabric and fold it up along the dashed line.  Pin and cut 2 skirt pieces.


Step 9:  Change your thread to match the printed fabric you picked out and cut earlier.    Taking the two skirt pieces place them right sides together and sew a 1/2″ inch seam on each side.  Trim the seam down and sew it again just inside the seam allowance with an over-lock stitch to prevent fraying.  Iron seams  to one side.  If you take care to iron them the opposite direction as the side seams on your overall top they will nest nicely and match well for sewing.  This will lower the overall bulk of the finished seam for you as well.

Step 10:  Repeat step 7 from your jean circle on your printed fabric circle if desired.  This will allow you to lightly gather the skirt panels to make making them to the overall top section easier.  For some reason I needed this for the front section but not the back section.  I was glad I took the time to do it.


Step 11: Match side seams of printed skirt section with overall top section and pin in place from the blue jean side.  I like to use a 3 pin technique which is one pin in the middle of the seam and one pin on each side of the seam.  This keeps the seams solidly aligned.  Pin the rest of the skirt to the overalls gathering your basting line as needed to ease and match the fabric widths.  Change the thread back to match your overalls.  Sew 1/2″ in. seam from the blue jean side as well so you can watch your pocket lining and don’t accidentally sew them into your seam.


Step 12:  Trim the seam down and sew it again just inside the seam allowance with an over-lock stitch to prevent fraying.  Again being careful of your pocket lining.  Pull out basting gathering seams if desired.  I pick it out with a seam ripper from the front and only the sections that show on the right side of the outfit I am working on.  You should have sewn over and hidden most of the basting seam.  I always over-lock stitch jeans because otherwise they continue to fray each time they are worn and washed.

Step 13:  With right sides together match the side skirt seams with two of the ruffle seams and pin using the 3 pin technique again.  Pull one basting string to gather the front and back.  Distribute the gathers evenly until the ruffle fits nicely to the skirt line.  Pin to the skirt edge.

Step 14:  Sew ruffle to skirt with a 5/8″ inch hem.  Trim the seam and over-lock stitch the edges again.  Iron the seam towards the jean ruffle and you are finished.

Pair it with a cute under shirt of your choice and you have a lovely outfit any little girl would love to wear.  Plus you now have a durable pattern to use for next time which will save quite a bit of the work especially if you want to convert overall shorts into a dress.

Tuesday, June 24, 2014

Receiving Blanket Embroidery: A Gift of Love - A Quick Baby Blanket Tutorial

Today's project is a gift of love.  One of the gifts I was given when my youngest daughter was born was a set of 2 newborn receiving blankets embroidered with a cute teddy bear and her name.  They were given to me with instructions to enjoy finishing off the blankets as I wished since my friend knew I enjoyed crafting.  This little project turned into a great stress reliever for me at a time when I needed it most during recovery.  When I was healthy enough to actually work on finishing these blankets, my daughter had far outgrown the newborn receiving blankets. So, I had to come up with another plan for them.  After a fun trip to the fabric store for some cute coordinating baby flannel fabric,  I got to work.  I wanted a nice large reversible blanket that would work for her for quite a while, so I used the size the ones given to me as my base size.

Prewash your fabric: I always do this for baby projects and anything that will be washed often to pre-shrink it and remove any extra dye from the fabric.

Square up your edges: Use a rotary cutter, cutting mat and quilting rulers.  Then, cut eight squares (two of each fabric) all the same size; mine are 19 1/2" inches by 19 1/2" inches.  You can get this size with 3/4yard of each coordinating flannel.  I already had two squares, so I only needed three other fabrics, but you will need a total of four fabrics to complete this project.

Next, using matching thread, sew your squares together in pairs with a 1/4" inch seam allowance.  This blanket was done with pink and purple together and then gingham and print together.

Pin your pairs of squares together so you now have a four patch and sew.  I like to use a Three Pin Technique.  This technique is used for helping to keep your fabric from moving while lining up points and corners or matching seam lines while sewing.  Iron your seams in opposite directions from each other so they will nest snuggly when pinned.  Then,  you put the first pin directly into the center of the seam with the second and third pin closely placed on either side of the first pin.  Sew up your seams and then iron flat.

Now you should have two large four patch pieces of fabric.  With right sides together, start your edge seams just past the middle on one side and sew all the way around to just short of the middle when you reach that first side again.  I used a 1/4" inch seam allowance again.  When you are finished with each side you should have 5-6" inches of open edge that has not been sewn.

Clip your corners seam allowance at about a 45 degree angle.  This will allow them to lay flat instead of being bulky with extra material when the project is finished.  Then, using that opening turn your project right side out.

Now, iron that open section with the seam allowance neatly folded on the inside and with thread that will blend into the fabric stitch this opening shut.  You can't see it on my blanket because I covered the edges with a decorative stitch.

To finish off this project with a bit of embroidery flare, I chose a variegated thread that went well with the fabrics I picked and then selected a decorative stitch I liked on my machine and stitched it all the way around the edge of the blanket.

And your project is finished!  My finished blanket ended up being approximately 38 1/2"inches square, which is a nice big size. At six months old, she still has plenty of growing room and space to snuggle in it.  It was so nice to have a project I could work on a little bit at a time and rest in between each step while I recovered from surgery.  It really gave me something to focus on besides how painful everything felt and how useless I was feeling because I was on such limited activity.  I can't thank my friend enough for her thoughtful gift that was an answer to an unspoken prayer just for its ability to keep my spirits up while I worked on it.

Monday, June 23, 2014

Those Little Rebels We Call Socks Tamed At Last - Laundry Tips & Organization


As mom's most of us have at least one household chore that we really don't enjoy doing.  For some it's laundry and for others it's cleaning bathrooms.  Lately since laundry is one of the few household chores that I am not medically restricted from, I have discovered that socks have become one of the most frustrating things to deal with.  As a family of seven it often feels like we have a million of these little buggers.

They come off all over the house like shoes typically do and find their way to places I would never imagine they should be.  I have found them on the kitchen counter, in the trash, under the couch, in the bathtub and the toilet (thanks to my four year old).  Plus that is just the dirty ones.  Heaven forbid they actually make it into the hamper where they belong.  Once clean I find them in places like stuffed in the kids closet because they didn't want to put their clothes in their dresser, in my diaper bag, because you never know when someone will need a clean pair with a six month old and a potty trainee.  They even miraculously find their way inside folded sheets to be discovered the next time we put clean ones on someone's bed.  I used to say I was an organized person before I had kids, now I only say I usually find what I need even in the chaos.  And I constantly remind myself:

"To every thing there is a season, and a time to every purpose under the heaven:"
Ecclesiastes 3:1

So it must be organization season this week at my house because I have been working hard to tackle our sock mania and I have come up with a few tricks and tips that I would love to share with you.

1.  Turn Them Right Side Out - I find that washing socks left turned inside out more often then not leaves dirt and bits of grass or whatever stuck to my kids socks.  So I work at turning them right side out a little at a time.  When you pick a pair up to put in the hamper, turn them right side out before tossing them in, when you make the kids who left them pick them up and put them in the laundry remind them to turn them right side out and finally when I am sorting laundry to put in the washer I turn any socks right side out that escaped the process before.  I have found this cuts down on the aggravation that builds up while I am folding laundry because I no longer discover still dirty socks that have to be washed again (I used to call these the perpetual dirty sock) and I don't spend a lot of time all at once doing a very tedious task.

2.  Dresser Drawer Bins - I measured the inside of my kids dressers and bought some plastic tubs that would fit.  They don't need lids because that would make it to much for my kids to deal with.  Just about any open basket or bucket that will fit in the drawer will work nicely.  I like two per kid for the essentials.  Into one goes all those little sock rebels.  As long as they are turned right side out and in the correct kids clothes pile I don't even bother to fold them anymore.  Which saves me time and countless amounts of aggravation.  Into the second bin goes their underwear.  Finally in the left over space they keep little things like tights, belts and ties for dress clothes.  This plastic bin idea works fantastic with baby clothes too.  Since their clothes are smaller I buy smaller bins so more of them fit in the drawer.  I keep one for socks, bibs, hats, hair bows, pacificers & clips, and even those newborn hand mittens and booties  all separated by a bin since they are so tiny they are impossible to fold anyway.

I am finally mature enough to willingly admit that my mom did know something when I was a kid.  I know most teenagers insist that they will never be like their parents when they grow up and often say their parents couldn't possibly understand what they are going through.  Fortunately as I have gotten to be an adult I have realized that this is not the case.  I know without a doubt that my mother understood all too well the constant struggle with socks raising a houseful of girls.  This last tip is directly from her sage wisdom all those years ago when I was young.

3.  Mark Your Socks - I mark my kids socks so I can tell them apart easily while sorting.  Socks come for a large range of shoe sizes in one bag, and for all of my daughter's lives so far; they have always worn the same size and usually the same style of sock.  The first time I bought two of the exact same packages of socks for my girls I knew I had to do exactly what my mom did to my socks.  You pick a color of sewing thread that will stand out against the color of the sock and you sew a button stitch onto the corner of a toe seam.  This is simply the back and forth stitch used to attach a button to a shirt and it quick and easy to do.  Make sure that you pick one side of the seam either left or right for all your socks and stick to it.  This way you only have to check one spot on every sock you wash and sort.  For those without a sewing machine this could be done by hand with a simple whip stitch but it would definitely take more time.  For my girls since their are only 2 of them I only had to mark one set of socks.  I know the ones without marks go to the other daughter.  And I am now doing this for my boys as well.  So THANK YOU MOM for teaching me by example how to tackle socks and all the other sage advise you gave me throughout the years.


"Behold, mine house is a house of order, saith the Lord God, and not a house of confusion."
Doctrine & Covenants 132:8

It is amazing how much a little bit of order in our socks has simplified my family's life.  No longer do I hear "Mom I don't have any clean socks!"  except maybe on laundry day.  They always know right where they are and they don't disappear in between other folded clothes like shorts and pajamas on their way to the drawer.  Plus even though I don't match and fold their socks anymore they never have trouble finding a match themselves.  Which means one less thing I am doing for them.  YEAH!

The animals in the ark may have come two by two, but the socks in our family go into the bin one by one.  My 9 & 10 year old girls have developed a love for wearing mis-match socks.  Especially to school.  I think this is their way of showing their personality since they have to wear uniforms.  And to them the brighter and more colorful the better.  So often I have socks in the laundry without their match even being dirty.

The laundry issues with socks escaping to the far reaches of the house may never be completely conquered but at least their stress creation is a little bit lower for this mother and maybe for you as well after reading this.  Do you have laundry or clutter tackling tips that you love and work for your family?  I would love to hear them in the comments below.

Wednesday, May 28, 2014

Sewing is Service A Blindhem Sewing Tutorial

 
Over the last year with my difficult pregnancy and long term stay in the hospital and recovery afterwards I can not count the number of friends and family who have been here to serve and help our family.  The house work, childcare, prepared meals, and emotional support have been enormous.  And now that things are finally starting to get back to normal I have started looking for ways I can pay it forward and give back.  So I wanted to share with you today's service project.  I am working on shortening the hems on some dress pants and slacks for a neighbor of mine and figured since it was something that is pretty easy to do so I would make a tutorial to share for anyone wanting to know how.  So here it is my very first attempt at making a tutorial.

First whoever is going to be wearing the pants needs to try them on for you.  Then you put a pin in the back of the pant leg where they want to hem to fall.  This is to mark the finished edge of the new length.  You only need to mark one pant leg.  Carefully match seams, lay the pants flat and add 2 inches from the pin.  Cut off extra fabric.  You can add less but I like to have a wide hem in case they need to be re-adjusted in the future.
 

Next you are going to zigzag stitch around the edge of both cuffs.  I like my stitch length set to 2 inches and my stitch width set to 4 inches for this.  The needle should go into the fabric on one side and then barely into or just over the edge on the other side of the zigzag.


Turn pants inside out; fold and pin a 2 inch hem line.  I use 1 pin in each seam, and 1 pin across from each seam.  Then one in between each of those pins to hold it in place and keep it straight.  Keeping the pins partially pulled up and away from the fabric so you don't melt the heads iron the fold.

 
Baste hem 1/4 inch from your zigzag line.  For basting set your stitch length as long as your machine allows because you will be pulling this seam out at the end.  My machine goes to 5 inches stitch length.  CAUTION:  Do Not snip the thread ends, and don't reverse sew or lock your thread in.  This will make it difficult to remove when the time comes.  Remove pins.


Switch to a blind hem foot on your machine and the blind hem stitch.  Mine is number 7 on my machine.  I took a photo so you could see which stitch I am talking about.  This foot doesn't allow reverse stitching so sew past your starting point a little ways to lock it in at the end.


Fold the hem inside the pants so only your little zigzag edge is sticking out.  Start your sewing close to one of the pants seams.  Keep the seam guide on the foot right in the fold of your baste line.


Once you are done stitching turn your pants right-side out again.  Remove baste stitching by pulling on one of the two threads.  If it breaks don't worry find the new end and keep going until it is completely removed.  Some fabrics can be pretty stubborn about this part.  If it's really difficult you can use your seam ripper from the right side of the pants so you don't chance cutting your other stitching.


TaDa!  You are finished.  Notice that the stitches should be barely visible on the right-side of the fabric.