Showing posts with label Clothing. Show all posts

Tuesday, November 20, 2018

Last Year's Pajamas Affect This Year's Planning

As Thanksgiving approaches this week, and my thoughts inevitably turn today gratitude and the upcoming holiday season I find myself thinking about the upcoming crafting projects that I should have started weeks ago and now only have a few a weeks left to get finished before Christmas is upon us.  This seems to be something that I do often as I looked back over last year's Facebook posts I realized that I am even a little ahead of schedule this year if I start on the children's Christmas pajamas anytime before December 10th.

Last year I was a little bit over confident in my time management vs. project size and quantity skills and I found that it got me into a little be of trouble.  I had previously made a set of fish pajama's for my daughter using Simplicity Pattern # 2481You can read pattern review and how that project turned out here.  It was such a hit with my daughter and such an easy project that I decided it was perfect for making in big quantities and I would be able to make three sets for my younger three child without any problem leaving me plenty of time to tackle a bigger project for my pre-teen and teen girls that are now borderline women's size clothing making their gift projects take longer simply because of their size.

Well it took me a week with a busy house and five children to get the first set of pj's done.  Red with blue Iron Man.  My youngest son Jeremiah was obsessed with super heroes at the time and I was really hoping he would like them.  But it took a whole week to make one set of pj's which left me on December 15th.

After the Iron Man pj's were done I was ready for a pattern switch and I cut and sewed the pink nightgown for my oldest daughter next.  It was a vintage looking nightgown New Look Pattern #6163.  This is an out of print pattern that I actually rescued from my mother's stash before she got rid of all her sewing patterns because it was a nightgown I had always wanted to make for myself.  Now the pattern is too small for me so I live vicariously through my girls by making it for them.

Their project ended up being a big recycle/up-cycle project.  Since that summer I had gone through all my sets of bed linens and set aside the ones that were worn out from age and washing or from our previous cats getting them with a claw.  So I took those sheets and let the girls pick the ones they liked best without them knowing why I was asking.  Then I matched them with a little bit of fabric and lace for the fancy old fashioned collars and this project was all set.

One Tip: when working with lace, especially if you want a layered effect and plan to put on a couple different ones.  Save yourself some time and at least look at the lace that comes pre-sewn and layered together for you already.  I know it is hard to see in the photo but the pink night gown has a three layer lace that came all put together and it was super quick and easy to sew on since it only took once around.  The blue nightgown however is the opposite, because it has two layers of single layer lace and I had to not only figure out how to layer it so it would look nice but I also had to take double the amount of sewing time to put it one since each layer was sewn on separately.

Everytime I got tired of sewing pleats or lace and ruffles I went back to crawling around on the floor to cut out sewing patterns. This gets harder every year and is honestly not something I am looking forward to doing this weekend as I cut out and plan for this years Christmas pajamas.  Unfortunately if I lay out the fabric on my folding tables it tends to slip and slide around and the pattern doesn't get cut out well.  Anyone have ideas for fixing this and helping me get off the floor?

My youngest daughter's pajamas from this pattern were a fun little up-cycle that ended up adding more time to the project than I had planned on or expected.  Originally they pink floral and blue butterfly fabric was part of a bedroom window curtain I had made for my girls bedroom clear back in 2005.  We have since moved several times and it never fit any of the windows right so I figured it was finally time to reuse the fabric.

Well this required a lot of seam ripping that I eventually gave up on and ended up simply cutting out the seams altogether because it was faster than using a seam ripper on them.  Once I got this set cut out and ready to sew I cut out my son's ocean themed set of pattern pieces.

By this time I was ready for a break and my knees were so sore that it took a couple of days before I was ready or willing to get back down on the floor to cut out the next couple of projects.

Honestly I am not sure how I did it, but I spent the morning of December 24th putting the finishing touches on one nightgown and two sets of shirt/pant pajama set and I was able to get them finished and wrapped just before dinner so that the kids could open them as their Christmas Eve gift.

Sewing the day of Christmas Eve instead of spending it playing games, singing carols and visiting with family is not something that I ever want to have to repeat.  And so it has me thinking about this year and wondering if I need to either get started sooner, or pick a different project to make for the kids that will still show them how much I love and care, without pulling me away from them during the holiday celebration.

Wednesday, January 17, 2018

An Outgrown Cello Shirt Becomes a New Upcycled and Resized Cello Shirt


And another t-shirt comes into being. My daughter outgrew her favorite cello shirt and since it wasn't one the other kids would wear I turned it into a new shirt.

This project took a bit of searching at the craft store I must admit, because I wanted to keep the upcycle in theme with the previous shirt that I was reusing.  We found some musical ribbon and buttons to help finish off her shirt much to my daughter's delight.

I cut the front of the shirt out with the words and designs and then cut the rest of her old t-shirt into strips.  The strips I sewed together end to end and then folded in half and sewed the ends to make a circle.  I also sewed a loose straight stitch along the outside where the two folded edges meet so I could gather, and gather those ruffles for the sleeves.

Once that was done I took another shirt from the local craft store and ironed the previous t-shirt front to the front of the new shirt and sewed the ruffles onto the inside edge of the t-shirt sleeve.  After the ruffle was attached I sewed on the ribbon to the top of the sleeves where it would cover the stitching from adding the ruffle and around the bottom edge of the shirt, because we had the ribbon and because my daughter asked me too.  Finally I attached the buttons I could with my sewing machine and then attached the others by hand.

I couldn't be happier with the way it turned out and my daughter couldn't be happier.  I also think these little projects might just be my answer for conquering stress.

Thursday, January 4, 2018

An Old Paint Stained Pair of Sweats and a New T-Shirt


My daughter had this pair of sweat pants that she had used to help paint the chicken coop and in the inside of the house and various other projects.  So they were paint stained in places.  She also put on a growing spurt recently and they had become too short for her.  So I found I had two choices.  Toss them out because lets face it her sister would never want to wear them or as she put it save them for me mom, they are my favorite pants.

So I got creative.  I removed the ankle cuffs.  No paint on those and they were in good condition.  Then I cut out the cute glittery words and accents on the pant legs.  How she managed to not get paint on those I will never know but the designs being paint free are the only thing that made this t-shirt upcycle possible.

Once that was done I played around with placement until we both liked it then I ironed on the designs to a t-shirt I bought from the local craft store when they were on sale.  Then I sewed the ankle cuffs to the sleeves and satin stitched around the sweat pants designs to give it a puckered wavy look.

She loved it and I got to be a bit creative today.  Win, Win.

Thursday, August 7, 2014

Beginner Friendly Skirt Project & Pattern Review


My husband is the oldest of nine children.  I know what you’re thinking “WOW!”, right? and” How did his parents keep their sanity?”  Well, fortunately they did and I happen to be lucky enough to be married to a wonderful man.  There are about eighteen years between him and his youngest sister.  When she started planning her wedding, most of her older siblings had already married and many had children of their own.  Since this created a challenge for large family photos and knowing who belonged to who, she came up with a wonderful idea to color coordinate each family so you could tell who belonged to who in the photo’s.  My family got burgundy red.  So Zephanie ordered matching burgundy ties for my husband and our two boys and I had a choice to make.  Do I shop and shop and shop until I find the right color dresses for both my girls and I or could I get creative and make something to match in time for the wedding?

I bet you can guess which option I chose.  I had previously purchased some burgundy rose fabric I had planned for a different project.  Using it for the wedding though was a chance to good to pass up.  I had a daughter who refused to wear dresses under almost all circumstances so I knew I was going to have to compromise and we settled on matching burgundy skirts with white blouses.
I chose two different patterns for the same style skirt for this project Simplicity #2576 and New Look # 6762.

If you are looking for a great beginning project look no further.  The skirts in these two patterns are simply quick and easy and are great for building confidence with your sewing skills or for a quick and fun weekend afternoon project.

Things I loved about this Simplicity pattern:  With only three pattern pieces to deal with, cutting out the pattern and prepping it for pinning to the fabric was a breeze.  The first page of the directions goes over the steps of picking the right size for you, how to prep the pattern pieces and the fabric, and how to cut the fabric.  Definitely a great choice as a first project for a younger sewer as well, because it explains the reasons for each step along the way.  My TIP:  Once you pick out your fabric, take it with you and take the time to browse the trim and ribbon sections of the store.  It may surprise you with what fun and beautiful options you will find to make your skirt one of a kind.  Overall I give this pattern 5 out of 5 stars because of the ease of the project and nice clear instructions.

I am always finding the cutest clothes when I shop for my girls and very rarely do you ever find the cute stuff in the women’s department.  I don’t know about you but I don’t mind ruffles and bows, bright colors and fun trims from time to time if done well.  Since I am still a beginner myself when it comes to altering patterns, trying to re-size the pattern I used for my girls was just not an option. So I was so thrilled to find the exact same pattern in a large enough size for me.

Things I loved about this New Look pattern:  Since I purchased this pattern specifically for the skirt to match my daughter’s, the included patterns for shirt and pants were just bonuses.  The shirt is a raglan style, with the slanted sleeve seams which is in style right now.  I am looking forward to making a few of these after my surgery that is coming up this week.  The directions for the skirts are written with slightly different wording but they are the same steps as the simplicity pattern.  Overall, I give the pattern 5 out of 5 stars because, although I haven’t made the shirt yet, the skirts worked out nicely and quickly without any issues or confusion.

So, if you were to compare the two patterns skirt for skirt, I have to say I liked the simplicity one just a little bit more, because the directions were written just a little bit more clearly, which made them faster to put together.

The good news is I got the projects done in time for us to head out for the wedding.  The bad news is we got down the road and clear up to Provo, Utah before I realized that after packing my garment bag with our dress clothes, I gave it to my husband who hung it in the coat closet so it wouldn’t get wrinkled while we packed; then, both of us neglected to get it put in the car!  With over 12 hours of driving there was no way we were going to turn around and go back for them.  That is the bad news.  We stayed with family in Salt Lake, Utah that night and spent the next day shopping, finding suits for my boys, and trying desperately to find something that might come close to the right color for the girls.  We weren’t able to find burgundy but we were able to find red dresses for both the girls and amazingly enough I not only found a burgundy skirt, but a nice blouse to go with it for the wedding.  I count my many blessings for that small answer to prayer.  How did the wedding turn out you might ask?  Well, things went off without a hitch and the pictures turned out great even without my girls matching us exactly and that is the saving grace.
  • Did I have fun making the skirts?  Definitely.
  • Would I make the skirts again?  Of course! Especially to teach my girls to sew.
  • Do we wear them often after the wedding?  Quite a bit, they are super cute and work great for church on Sunday’s.

Thursday, July 31, 2014

Up-cycling Window Valances into Toddler Dresses


My baby girl is finally getting old enough that it was time to move from a portable bassinet for sleeping to a more permanent crib.  While getting the location of the crib cleared out and the bed set up I pulled out the bag that I had stored my baby girl bedding in since our family’s last use of it.  Tucked in with the sheets, bumper, and bed skirt were three valance curtain panels.  These panels had been perfect when I first set up my eldest daughter’s nursery years ago, but after several moves and some custom bedroom paint they just didn’t fit the room the new baby was going to be in at all.  My first thought was to put them in the bag of clothes items we had outgrown and were getting ready to donate.  But before I could actually bring myself to do this pinterest struck again.  I had been posting ideas for up-cycling different types of clothing all week on my sewing board and the idea of up-cycling these darling window treatments was too irresistible to pass up.  So I dug around and looked through my baby and toddler patterns until I found something that I thought would fit the length and width of the panel well.  I ended up choosing the pinafore dress from Simplicity Pattern #2461.

After cutting out the pattern pieces and looking over the sewing directions, I decided that I only had enough fabric to do view C out of the curtains because sleeves in view A or B would not work right because of the style and layers of the panels.  The pattern itself also called for an open and curved back on the pinafore which worried me because the layers of material weren’t going to look right with a curve and a ruffle in them.  It was easy to feel a little frustrated and I went back to my pile of patterns and tried to find one that might look better.  I didn’t have anything that I thought would work any better than the pattern I had already chosen.  Which meant at this point I was going to have to be creative or give up on the project.  These curtains I admit hold a great deal of sentimental value for me and the idea of giving them new life and letting them be used one last time had me determined to figure out how to make this project work.  After some serious thought and moving pattern pieces around a bit I decided to alter the dress style itself.  I left off the back sections completely and opted for two front pieces.  One front piece to work as intended and one to work as the new back piece so these curtains would work out in the design the way I wanted.  Since this pattern is a multi-size pattern it gave me the flexibility to choose the size 3T that would fit exactly with length of the curtains.  I cut the two front pieces out one curtain and had just enough at the top for the yoke sections as well.  It surprised me that I was able to get an entire pinafore out of one panel and after looking at the other two panels I decided I would just be crazy enough to try mass production sewing on a small-scale and make three dresses at the same time.  Looking back on the project now I can honestly say I am not sure what I was thinking.  By using pre-sewn curtains it actually took quite a few of the steps out of the project and made it faster to complete, but I now had three of them to make so I am certain it didn’t save the kind of time it would have if I had only been making one.

After finishing the pinafore itself I knew I was in it for the long haul because I wanted the cute under dress with the short sleeves to go with it.  So I ended up using a 40% off coupon at JoAnn’s and found some really cute moss-green fabric to match the valance colors.  While I was shopping the color choice I wanted brought my fabric options down to three, satin which dries with definite water spots when it gets wet so not a good choice for a baby who drools and spits up, an acetate which can only go to a dry cleaner also not the best choice for a baby or toddler, or a pretty cotton poly blend that was machine washable.  I can’t stress enough when you fabric shop for small children always take the time to read the care instructions on the end of the bolt.  It will make you happier in the long run so you don’t accidentally ruin all your hard work because you forgot to read it and washed something that shrank or stained.

Things I loved about this view A & B dress pattern:  I really liked the short sleeve vs. long sleeve option.  Living out here in the desert we don’t need long sleeves very often and this versatility was nice.  I absolutely loved the way they used the bias tape along the neckline and collar.  Collars are always something I have struggled with a bit and the directions and bias on this section really made this collar much easier to put on.  Things that need to be fixed about this dress pattern:  In step 16 where it goes over the sleeve directions it doesn’t reference which sleeve option the directions apply to or that they apply to both.  You have to read ahead to 17 to figure out that it applies to both sleeve options and a little clarity here might be useful.  My Tip:  For the step of hemming bottom edge zigzag stitch the very edge and set you stitch width to the 1/4 inch they say to press.  This will give you automatic fray prevention and a fold line so you can skip ironing those teeny tiny edges and possibly your fingers.  I figured this out the hard way.

Things I loved about this view C pinafore pattern:  This particular dress has an option for a super cute butterfly shaped pocket.  I know I didn’t use it on my up-cycling project but it is really cute and I definitely see myself using it on a future project.  The pattern sews together well enough that I had no problems switching the back section out for a second front piece allowing you to substantially change it into an almost completely different dress giving it extra versatility.  My TIP:  After sewing my yoke section down completely my stitching line across the front as not completely straight.  I covered this with cute little green daisy flower trim.  You will want to be extra careful when sewing this down to keep the fabric from slipping around at all or be prepared to cover that seem with a bit of trim or ribbon.  I also used a package of bias tape in a matching color along the arm holes for the shoulder ties instead of fiddling with making my own ties.  If you opt for this short cut be mindful that bias tape does come with random seams in some packages so be prepared to cut around those or use them.  I cut my bias tape to the length they had you cut the fabric for making your own ties.  I also recommend that you cut them a little longer than this.  It will give you a slightly more draped bow when you tie it on the child wearing it.

This pattern also comes with pieces and directions for shorts or bloomers.  While they look cute I can’t say much about them because I didn’t make them for this project.

Overall I give this pattern 5 out of 5 stars because even with the lacking reference on the sleeve instructions it wasn’t difficult to put together and it is super versatile and has tons of styling options written right into the instructions and photos giving different trim and contrasting collar suggestions.  It really gets your creativity flowing and allows you see some of the options you have.  Finally don’t be afraid to add things like the decorative buttons I put on the front of the pinafore for extra cuteness.  This only lets you express your talents a little more and personalize your project a little better.

Thursday, July 24, 2014

From Overalls to Dress: A DIY Sewing Tutorial


Have you ever purchased an outfit for your kids that you thought would just look the cutest on them only to find that it was defective or they only got to wear it once or twice before they outgrew it?  I seem to have this problem with overalls quite often.  So much so that I pretty much quit buying them for my kids until now.  My oldest daughter who is now ten by the way, received the cutest outfit with overalls when she was a baby, that I could never quite bring myself to part with, even though it was defective.  The little snaps up and down the inside of the legs to make diaper changes easy never stayed closed properly.  Every time she wore these cute pants the legs opened after less than 30 seconds of wear time.  So I tucked them into my mending pile and promised myself I would figure out how to fix them someday.  Well, she outgrew them and her sister missed out on them completely and the years passed as they got pushed aside again and again every time I tackled my mending pile.
Now that my youngest and last little girl has arrived and is growing so quickly I realize that it is now or never for these cute little overalls.  The inspiration for this project came from my sister-in-law Meggan who gave my older girls up-cycled dresses similar to this a couple of years ago.  Remembering those outfits gave me the idea I needed to pass along this little DIY sewing tutorial to you.

Supplies You’ll Need:
1 pair of overalls either shorts or pants will work
cotton/blend print fabric to match your overalls design if it has any (I tried to match the embroidery colors and design on mine)
cutting mat, ruler and rotary cutter
matching thread
jeans sewing needle 80/12 size
Pellon 806 Stitch-N-Tear 20″ wide – White
pencil and sharpie marker
general sewing supplies


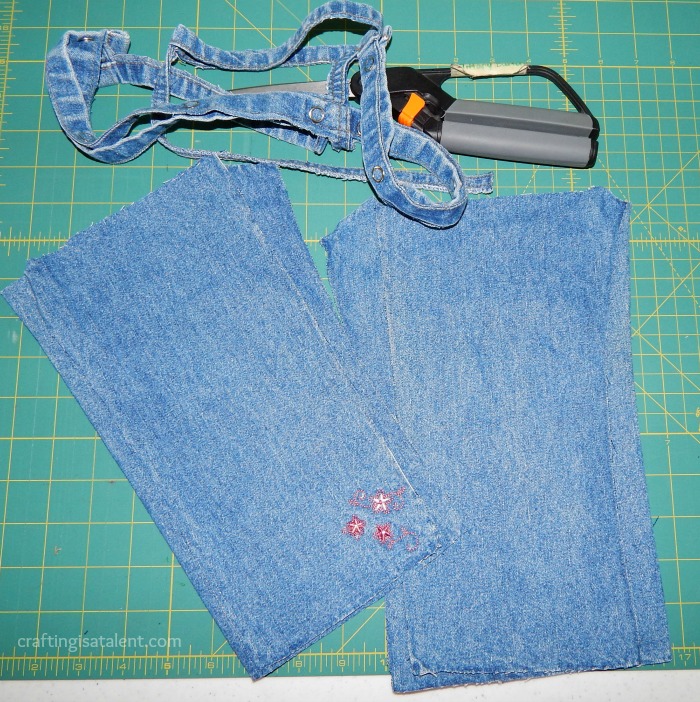
Step 1:  Fold your overalls in half and cut carefully with a rotary cutter.  I cut my pair low enough to save the fancy pocket design and the inner pockets themselves.

Step 2:  Lay flat and trim any uneven spots off.


Step 3:  Lay out your stitch-n-tear panel.  I buy mine by the yard so I have it large enough to make pattern pieces with, it’s fairly inexpensive and holds up better than the tissue that comes in normal patterns.  If it has issues laying flat for you, iron it to remove any folds, bends and wrinkles.  Unfold and lay your pant legs flat on your stitch-n-tear panel.  Then outline the pants with a pencil.  Add a 1/2″ seam allowance to both sides of the outline and go over the pencil lines with a black sharpie.


Step 4:  Cut the seams off the legs you just removed and straighten them.  I cut mine to 4in. x 11in.  I did this so I could add a cute ruffle to the bottom of the dress and so I could save the matching embroidery design from the pant leg.  If you don’t want a ruffle this step and step five could be skipped.  I wanted to save the cute little flowers embroidered at the bottom of the pant legs.


Step 5:  Sew the leg sections end to end until you have a nice jean circle with a thread color matching the jeans as well as you can.  I use a jeans needle for this entire project.  They are excellent at getting through the thicker fabric and will save your project and your sewing needles from breakage and frustration.  Sew with an over-lock seam along the edge to prevent fraying.  The over-lock stitch is number eight on my machine  I have a picture of it for you so you know what the stitch looks like.  Press seams to one side.


Step 6:  Zigzag or over-lock stitch the very bottom edge of your jean circle.  I adjusted my stitch width to 3 inches in order to save my embroidery.  Then fold it 1/8-1/2″ to the inside and hem.  This will be the bottom hem of your skirt.  If you aren’t trying to save a design like I was you can give yourself a larger hem allowance.

Step 7:  About 1/4″ in. from the upper edge of your jean circle baste a long running stitch all the way around.  To do this simply change the stitch length on your straight stitch to as long as it will go on your machine.  My machine will lengthen this stitch to 5″ inches.  Do a second one 1/4″ in. away from the first one.  Be sure not to lock in or reverse stitch your start and finish on these two seams because you will be using them to create the gathers in your ruffle.


Step 8:tear pattern and put on a dashed line for the ruffle adjustment.  Next pick a patterned fabric to match your pants design or that looks cute with your overalls.  I picked colors to match the accent flowers on the overalls.  Lay the pattern on the fabric and fold it up along the dashed line.  Pin and cut 2 skirt pieces.


Step 9:  Change your thread to match the printed fabric you picked out and cut earlier.    Taking the two skirt pieces place them right sides together and sew a 1/2″ inch seam on each side.  Trim the seam down and sew it again just inside the seam allowance with an over-lock stitch to prevent fraying.  Iron seams  to one side.  If you take care to iron them the opposite direction as the side seams on your overall top they will nest nicely and match well for sewing.  This will lower the overall bulk of the finished seam for you as well.

Step 10:  Repeat step 7 from your jean circle on your printed fabric circle if desired.  This will allow you to lightly gather the skirt panels to make making them to the overall top section easier.  For some reason I needed this for the front section but not the back section.  I was glad I took the time to do it.


Step 11: Match side seams of printed skirt section with overall top section and pin in place from the blue jean side.  I like to use a 3 pin technique which is one pin in the middle of the seam and one pin on each side of the seam.  This keeps the seams solidly aligned.  Pin the rest of the skirt to the overalls gathering your basting line as needed to ease and match the fabric widths.  Change the thread back to match your overalls.  Sew 1/2″ in. seam from the blue jean side as well so you can watch your pocket lining and don’t accidentally sew them into your seam.


Step 12:  Trim the seam down and sew it again just inside the seam allowance with an over-lock stitch to prevent fraying.  Again being careful of your pocket lining.  Pull out basting gathering seams if desired.  I pick it out with a seam ripper from the front and only the sections that show on the right side of the outfit I am working on.  You should have sewn over and hidden most of the basting seam.  I always over-lock stitch jeans because otherwise they continue to fray each time they are worn and washed.

Step 13:  With right sides together match the side skirt seams with two of the ruffle seams and pin using the 3 pin technique again.  Pull one basting string to gather the front and back.  Distribute the gathers evenly until the ruffle fits nicely to the skirt line.  Pin to the skirt edge.

Step 14:  Sew ruffle to skirt with a 5/8″ inch hem.  Trim the seam and over-lock stitch the edges again.  Iron the seam towards the jean ruffle and you are finished.

Pair it with a cute under shirt of your choice and you have a lovely outfit any little girl would love to wear.  Plus you now have a durable pattern to use for next time which will save quite a bit of the work especially if you want to convert overall shorts into a dress.