Friday, September 12, 2014

Typerwriter Art What a Talent!

While puttering around on Facebook this morning, checking in on family and friends posts and dropping notes to say hello I came across this news article that really inspired me.


Here is a man who faces challenges and struggles every single day of his life.  Yet he is inspiring people and using his talents and determination to create beautiful works of art to share with those around him.  I would never before have considered using a type writer of all things in the way this man can, but I am inspired by it.  So take a moment to watch this news story and let yourself be inspired too.  Then look at yourself and your life and answer the question he poses:

“What Can You Do?”

Just as Paul knows his gift for typewriter art is a talent from the Lord, each one of us has talents.  And it is our job to figure out what those talents are.  Once we know what we can do, developing and sharing those talents with others strengthens us and allows us to grow.

Thursday, August 14, 2014

Thoughts While Mending

Okay I know and you know that my recovery process is not what this crafting blog is supposed to be about, but bear with me here.  As the dust from the recent trip to the hospital has begun to settle and the pain meds have started to kick in enough I can bear to sit up for longer then it takes to crawl to the privy,  I have had a lot of time on my hands to think.  And today something someone said to me as a reprimand really stood out and made me think.
“Tiffany you shouldn’t over do it like yesterday.  It will just make healing harder and take longer.”
Yesterday, I had a seven month old little girl, who was congested and running a slight fever, fussing, crying and unable to sleep unless she was being held in a semi-upright position.  She weighs enough that after a major abdominal surgery last Thursday I am not supposed to pick her up or hold her for the next six weeks at least and probably closer to twelve if I strictly adhere to the doctor’s wishes.  But there is something about a mother’s love and instinct that is tenacious and doesn’t care what the Doctor says if it goes against what you think your child needs.  Even when it goes against everything a doctor tells you that you should NOT do in order to help yourself recover and heal.  After what felt like forever but was probably more like fifteen minutes with her Gramzie I couldn’t take it anymore and had to hold my little girl even though I am not supposed to right now. Those tears and cries broke my heart, so we piled on the pillows and hoped it would protect me while I attempted to soothe my little girl.  Eventually though my body could take no more and I had to once again give my precious daughter to her Nana who took her from me and promptly got her to sleep.  The moment her Nana swayed back into the room rocking Kyrilene in her arms the innocence in that little sleeping face began to melt all the pieces of my heart right back together again.

Exhausted and in pain I rested now that I knew my daughter was sleeping comfortably, and when my four other children arrived home from school I was able to sit up and hug each of them and ask about their day.  They were all chipper and after a quick snack dove into their homework.  Not long after that I noticed my six year kept sneaking in to “check on me” and give me another hug.  Sneaking I think because his Gramzie was trying to entertain and distract the kids for the afternoon while I rested.  By about the third hug I knew he needed time with his mom.  At which point I also knew I had a tough choice to make.  Over do it and pay for it with extra pain that night and probably the whole next day or send him back downstairs with his unspoken needs unmet.  We spent the afternoon playing UNO and Monopoly and my six year tromped on me, but I blame that on the meds.

Eventually their daddy got home and he called them all downstairs for dinner and I felt an overwhelming sensation of being caged.  Here I was hurting and facing another night eating what little I could in bed in my room alone.  The struggles with my health have become chronic over the last sixteen months since we found out we were expecting our youngest daughter and I was definitely feeling sick to death of hurting and eating dinner without my family at that moment.  So I said a silent prayer asking for the Lord to sustain me through the meal and went down to dinner, to the shock and delight of my entire family.  It only lasted 15 minutes while we ate and I had to have help getting back up to bed but for that moment in time we had our family back.  Since then I have been flat on my back aching and wishing the pain meds would just take the edge off the swelling and pain so when I was asked this morning how I was doing I  was honest and said I over did it yesterday and I am hurting today because of it.

So back to the reprimand.  Was it given in love?  Yes, she just wants me to take it easy and allow myself to heal.  But it also required a carefully thought out response as well.  Over this journey with chronic health concerns and life threatening moments it is no longer about the hope of complete recovery or all the things I will be when I am back to quote unquote “normal“.  For many who struggle with chronic issues they are the new normal and you have to learn to deal with, cope and hope even though they are with you every single day.  I realized yesterday with my daughter and my son that I have a choice.  Put off the needs of those around me because I am suffering or focus on what I could do to emotionally to lift them up and let the cards fall where they may.

Holding my daughter was about me telling her that I was here and I loved her especially when she was hurting.  Because even though my broken and bruised body wouldn’t let me do it for long, it would let me do it for a little while.  I love my children so much I am willing to personally suffer just a little more to show my love for each of them and isn’t that exactly what the Savior has done for each one of us?  Our Heavenly Father loves each of us so much that he gave us a Savior who suffered all things so He could bear up our burdens.  And if He loves us enough to do that then how much does He ache to hold and comfort us when we are sick and hurting ourselves; the same way I ached to comfortable my little girl.  Just as I could not turn away the need for love and comfort that my son so meekly asked for by checking on me, I also can not think of a single time in my life when I have gone to Lord needing comfort like my son came to me and have not been overwhelmed by feelings of His love for me.

Not for a single moment do I regret my choices and the extra pain I am in today because they are reminders of the love my Savior Jesus Christ has for me and the love I have for my family.  Did I over do it yesterday?  Strictly from a physical standpoint, yes I did.  Am I paying the price for it now?  Yes I am.  But from spiritual standpoint and loving the journey despite the heartaches yesterday was the best day ever and I would totally do it again in a heart beat.  I simply hope that others who suffer with challenges and chronic issues whether they are spiritual or physical in nature can learn one thing:
It doesn’t have to be fixed and we don’t have to be back to “normal” to continue to love and show love for those around us.
So I hope and pray that each of you will not put off the help and love you can give to others just because you are suffering too.  Each and everyone of us is suffering and struggling with something.  It’s how we choose to handle it that builds our character and makes us who we are.

Thursday, August 7, 2014

Beginner Friendly Skirt Project & Pattern Review


My husband is the oldest of nine children.  I know what you’re thinking “WOW!”, right? and” How did his parents keep their sanity?”  Well, fortunately they did and I happen to be lucky enough to be married to a wonderful man.  There are about eighteen years between him and his youngest sister.  When she started planning her wedding, most of her older siblings had already married and many had children of their own.  Since this created a challenge for large family photos and knowing who belonged to who, she came up with a wonderful idea to color coordinate each family so you could tell who belonged to who in the photo’s.  My family got burgundy red.  So Zephanie ordered matching burgundy ties for my husband and our two boys and I had a choice to make.  Do I shop and shop and shop until I find the right color dresses for both my girls and I or could I get creative and make something to match in time for the wedding?

I bet you can guess which option I chose.  I had previously purchased some burgundy rose fabric I had planned for a different project.  Using it for the wedding though was a chance to good to pass up.  I had a daughter who refused to wear dresses under almost all circumstances so I knew I was going to have to compromise and we settled on matching burgundy skirts with white blouses.
I chose two different patterns for the same style skirt for this project Simplicity #2576 and New Look # 6762.

If you are looking for a great beginning project look no further.  The skirts in these two patterns are simply quick and easy and are great for building confidence with your sewing skills or for a quick and fun weekend afternoon project.

Things I loved about this Simplicity pattern:  With only three pattern pieces to deal with, cutting out the pattern and prepping it for pinning to the fabric was a breeze.  The first page of the directions goes over the steps of picking the right size for you, how to prep the pattern pieces and the fabric, and how to cut the fabric.  Definitely a great choice as a first project for a younger sewer as well, because it explains the reasons for each step along the way.  My TIP:  Once you pick out your fabric, take it with you and take the time to browse the trim and ribbon sections of the store.  It may surprise you with what fun and beautiful options you will find to make your skirt one of a kind.  Overall I give this pattern 5 out of 5 stars because of the ease of the project and nice clear instructions.

I am always finding the cutest clothes when I shop for my girls and very rarely do you ever find the cute stuff in the women’s department.  I don’t know about you but I don’t mind ruffles and bows, bright colors and fun trims from time to time if done well.  Since I am still a beginner myself when it comes to altering patterns, trying to re-size the pattern I used for my girls was just not an option. So I was so thrilled to find the exact same pattern in a large enough size for me.

Things I loved about this New Look pattern:  Since I purchased this pattern specifically for the skirt to match my daughter’s, the included patterns for shirt and pants were just bonuses.  The shirt is a raglan style, with the slanted sleeve seams which is in style right now.  I am looking forward to making a few of these after my surgery that is coming up this week.  The directions for the skirts are written with slightly different wording but they are the same steps as the simplicity pattern.  Overall, I give the pattern 5 out of 5 stars because, although I haven’t made the shirt yet, the skirts worked out nicely and quickly without any issues or confusion.

So, if you were to compare the two patterns skirt for skirt, I have to say I liked the simplicity one just a little bit more, because the directions were written just a little bit more clearly, which made them faster to put together.

The good news is I got the projects done in time for us to head out for the wedding.  The bad news is we got down the road and clear up to Provo, Utah before I realized that after packing my garment bag with our dress clothes, I gave it to my husband who hung it in the coat closet so it wouldn’t get wrinkled while we packed; then, both of us neglected to get it put in the car!  With over 12 hours of driving there was no way we were going to turn around and go back for them.  That is the bad news.  We stayed with family in Salt Lake, Utah that night and spent the next day shopping, finding suits for my boys, and trying desperately to find something that might come close to the right color for the girls.  We weren’t able to find burgundy but we were able to find red dresses for both the girls and amazingly enough I not only found a burgundy skirt, but a nice blouse to go with it for the wedding.  I count my many blessings for that small answer to prayer.  How did the wedding turn out you might ask?  Well, things went off without a hitch and the pictures turned out great even without my girls matching us exactly and that is the saving grace.
  • Did I have fun making the skirts?  Definitely.
  • Would I make the skirts again?  Of course! Especially to teach my girls to sew.
  • Do we wear them often after the wedding?  Quite a bit, they are super cute and work great for church on Sunday’s.

Thursday, July 31, 2014

Up-cycling Window Valances into Toddler Dresses


My baby girl is finally getting old enough that it was time to move from a portable bassinet for sleeping to a more permanent crib.  While getting the location of the crib cleared out and the bed set up I pulled out the bag that I had stored my baby girl bedding in since our family’s last use of it.  Tucked in with the sheets, bumper, and bed skirt were three valance curtain panels.  These panels had been perfect when I first set up my eldest daughter’s nursery years ago, but after several moves and some custom bedroom paint they just didn’t fit the room the new baby was going to be in at all.  My first thought was to put them in the bag of clothes items we had outgrown and were getting ready to donate.  But before I could actually bring myself to do this pinterest struck again.  I had been posting ideas for up-cycling different types of clothing all week on my sewing board and the idea of up-cycling these darling window treatments was too irresistible to pass up.  So I dug around and looked through my baby and toddler patterns until I found something that I thought would fit the length and width of the panel well.  I ended up choosing the pinafore dress from Simplicity Pattern #2461.

After cutting out the pattern pieces and looking over the sewing directions, I decided that I only had enough fabric to do view C out of the curtains because sleeves in view A or B would not work right because of the style and layers of the panels.  The pattern itself also called for an open and curved back on the pinafore which worried me because the layers of material weren’t going to look right with a curve and a ruffle in them.  It was easy to feel a little frustrated and I went back to my pile of patterns and tried to find one that might look better.  I didn’t have anything that I thought would work any better than the pattern I had already chosen.  Which meant at this point I was going to have to be creative or give up on the project.  These curtains I admit hold a great deal of sentimental value for me and the idea of giving them new life and letting them be used one last time had me determined to figure out how to make this project work.  After some serious thought and moving pattern pieces around a bit I decided to alter the dress style itself.  I left off the back sections completely and opted for two front pieces.  One front piece to work as intended and one to work as the new back piece so these curtains would work out in the design the way I wanted.  Since this pattern is a multi-size pattern it gave me the flexibility to choose the size 3T that would fit exactly with length of the curtains.  I cut the two front pieces out one curtain and had just enough at the top for the yoke sections as well.  It surprised me that I was able to get an entire pinafore out of one panel and after looking at the other two panels I decided I would just be crazy enough to try mass production sewing on a small-scale and make three dresses at the same time.  Looking back on the project now I can honestly say I am not sure what I was thinking.  By using pre-sewn curtains it actually took quite a few of the steps out of the project and made it faster to complete, but I now had three of them to make so I am certain it didn’t save the kind of time it would have if I had only been making one.

After finishing the pinafore itself I knew I was in it for the long haul because I wanted the cute under dress with the short sleeves to go with it.  So I ended up using a 40% off coupon at JoAnn’s and found some really cute moss-green fabric to match the valance colors.  While I was shopping the color choice I wanted brought my fabric options down to three, satin which dries with definite water spots when it gets wet so not a good choice for a baby who drools and spits up, an acetate which can only go to a dry cleaner also not the best choice for a baby or toddler, or a pretty cotton poly blend that was machine washable.  I can’t stress enough when you fabric shop for small children always take the time to read the care instructions on the end of the bolt.  It will make you happier in the long run so you don’t accidentally ruin all your hard work because you forgot to read it and washed something that shrank or stained.

Things I loved about this view A & B dress pattern:  I really liked the short sleeve vs. long sleeve option.  Living out here in the desert we don’t need long sleeves very often and this versatility was nice.  I absolutely loved the way they used the bias tape along the neckline and collar.  Collars are always something I have struggled with a bit and the directions and bias on this section really made this collar much easier to put on.  Things that need to be fixed about this dress pattern:  In step 16 where it goes over the sleeve directions it doesn’t reference which sleeve option the directions apply to or that they apply to both.  You have to read ahead to 17 to figure out that it applies to both sleeve options and a little clarity here might be useful.  My Tip:  For the step of hemming bottom edge zigzag stitch the very edge and set you stitch width to the 1/4 inch they say to press.  This will give you automatic fray prevention and a fold line so you can skip ironing those teeny tiny edges and possibly your fingers.  I figured this out the hard way.

Things I loved about this view C pinafore pattern:  This particular dress has an option for a super cute butterfly shaped pocket.  I know I didn’t use it on my up-cycling project but it is really cute and I definitely see myself using it on a future project.  The pattern sews together well enough that I had no problems switching the back section out for a second front piece allowing you to substantially change it into an almost completely different dress giving it extra versatility.  My TIP:  After sewing my yoke section down completely my stitching line across the front as not completely straight.  I covered this with cute little green daisy flower trim.  You will want to be extra careful when sewing this down to keep the fabric from slipping around at all or be prepared to cover that seem with a bit of trim or ribbon.  I also used a package of bias tape in a matching color along the arm holes for the shoulder ties instead of fiddling with making my own ties.  If you opt for this short cut be mindful that bias tape does come with random seams in some packages so be prepared to cut around those or use them.  I cut my bias tape to the length they had you cut the fabric for making your own ties.  I also recommend that you cut them a little longer than this.  It will give you a slightly more draped bow when you tie it on the child wearing it.

This pattern also comes with pieces and directions for shorts or bloomers.  While they look cute I can’t say much about them because I didn’t make them for this project.

Overall I give this pattern 5 out of 5 stars because even with the lacking reference on the sleeve instructions it wasn’t difficult to put together and it is super versatile and has tons of styling options written right into the instructions and photos giving different trim and contrasting collar suggestions.  It really gets your creativity flowing and allows you see some of the options you have.  Finally don’t be afraid to add things like the decorative buttons I put on the front of the pinafore for extra cuteness.  This only lets you express your talents a little more and personalize your project a little better.

Tuesday, July 29, 2014

The Hulk and Braiding Foot Bliss

The more I use my Bernina sewing machine the more and more I absolutely love it.  I have so many possibilities at my finger tips between the attachments and presser feet and accessories.  It could have been almost overwhelming if I had tried to learn about all the options at once.  And I admit when I pop into my local Bernina Dealer and ogle their latest machines I do feel a bit overwhelmed still with all the other options out there.  Recently, I sold some of my extra crafting supplies on Ebay and decided that I was going to spend a little bit of those proceeds on some new feet for my sewing machine.  One of the presser feet I purchased was the #21 Braiding Foot.  You can learn more about this presser foot at Bernina’s Website here.  Today, I used it for the very first time and I am in complete braiding foot bliss.

The word “Superheroes” has found a permanent place in our home.  They are some my family’s favorite types of movies.  And now that my kids are getting a little older, they have become so enthralled with them that all four of my older children requested superhero costumes for Halloween this year.  I admit I am a little bit intimidated by this request, and I am worried that I won’t be able to get them all completed in time especially with the upcoming surgery and twelve week recovery I am facing soon.  So I decided that just maybe if I worked on them a bit this summer I would have a better chance of getting them completed by October.
The Hulk is the costume that my husband and I chose for our four year old this year.  Mostly because he is super small for his age and so completely opposite of who The Hulk is in the films and cartoons that we found the idea of it pretty amusing.  So I tried to figure out the best way to make a cute costume and keep it as simple and time saving as possible.  I found an awesome baby/toddler costume on Etsy for Hulk that was my inspiration for this project.  You can check out my inspiration at: KadydidDesigns.  So I bought a pair of purple sweatpants and a white long sleeved t-shirt on Amazon and set to work as soon as they arrived.  First, I tried the pants on my son and had to cut off the extra length that would have been dragging, because of his being so small (makes waist and length sizes a bear to find that fit him well).  Next, I marked his knee where I would be doing the ragged edges.  After cutting the random edges around the knees I zigzagged the edge and proceeded to the waistline.  Because he beefs up when he gets angry The Hulk is always ripping and damaging his clothes and in the cartoons he often has twine or rope around his pants to help hold them up.  So I bought some 1/8 inch white cord to use for my version of rope and I am so glad to be able to say it fits in the braiding foot.

You just slip your cord or ribbon through the front of the foot, which keeps it centered and feeds it beautifully onto the fabric you are sewing.  With a zigzag stitch, I attached it all the way around the waistline of the sweats, after removing the faux purple tie that was attached when I purchased them.  I still can’t believe how slick and easy this cording went on.  The foot was great and kept the seam it was sewing next to in place so it didn’t curl funny. The feed on the machine was so even that the elastic in the waistband didn’t have a chance to shift or move and get sewn into the cord seam on accident.  So a tiny success in my sewing room today and a good start on at least one of my kids costumes.  I am so glad I splurged and invested in my new braiding foot as I now see many sewing possibilities for it in the future.  I highly recommend this foot for anyone who does clothing and costumes and well as home décor.  I am planning on adding green to the legs so I don’t have to use paint for the proper look and skin tone.  But that is a project and an update for another day.

Thursday, July 24, 2014

From Overalls to Dress: A DIY Sewing Tutorial


Have you ever purchased an outfit for your kids that you thought would just look the cutest on them only to find that it was defective or they only got to wear it once or twice before they outgrew it?  I seem to have this problem with overalls quite often.  So much so that I pretty much quit buying them for my kids until now.  My oldest daughter who is now ten by the way, received the cutest outfit with overalls when she was a baby, that I could never quite bring myself to part with, even though it was defective.  The little snaps up and down the inside of the legs to make diaper changes easy never stayed closed properly.  Every time she wore these cute pants the legs opened after less than 30 seconds of wear time.  So I tucked them into my mending pile and promised myself I would figure out how to fix them someday.  Well, she outgrew them and her sister missed out on them completely and the years passed as they got pushed aside again and again every time I tackled my mending pile.
Now that my youngest and last little girl has arrived and is growing so quickly I realize that it is now or never for these cute little overalls.  The inspiration for this project came from my sister-in-law Meggan who gave my older girls up-cycled dresses similar to this a couple of years ago.  Remembering those outfits gave me the idea I needed to pass along this little DIY sewing tutorial to you.

Supplies You’ll Need:
1 pair of overalls either shorts or pants will work
cotton/blend print fabric to match your overalls design if it has any (I tried to match the embroidery colors and design on mine)
cutting mat, ruler and rotary cutter
matching thread
jeans sewing needle 80/12 size
Pellon 806 Stitch-N-Tear 20″ wide – White
pencil and sharpie marker
general sewing supplies


Step 1:  Fold your overalls in half and cut carefully with a rotary cutter.  I cut my pair low enough to save the fancy pocket design and the inner pockets themselves.

Step 2:  Lay flat and trim any uneven spots off.


Step 3:  Lay out your stitch-n-tear panel.  I buy mine by the yard so I have it large enough to make pattern pieces with, it’s fairly inexpensive and holds up better than the tissue that comes in normal patterns.  If it has issues laying flat for you, iron it to remove any folds, bends and wrinkles.  Unfold and lay your pant legs flat on your stitch-n-tear panel.  Then outline the pants with a pencil.  Add a 1/2″ seam allowance to both sides of the outline and go over the pencil lines with a black sharpie.


Step 4:  Cut the seams off the legs you just removed and straighten them.  I cut mine to 4in. x 11in.  I did this so I could add a cute ruffle to the bottom of the dress and so I could save the matching embroidery design from the pant leg.  If you don’t want a ruffle this step and step five could be skipped.  I wanted to save the cute little flowers embroidered at the bottom of the pant legs.


Step 5:  Sew the leg sections end to end until you have a nice jean circle with a thread color matching the jeans as well as you can.  I use a jeans needle for this entire project.  They are excellent at getting through the thicker fabric and will save your project and your sewing needles from breakage and frustration.  Sew with an over-lock seam along the edge to prevent fraying.  The over-lock stitch is number eight on my machine  I have a picture of it for you so you know what the stitch looks like.  Press seams to one side.


Step 6:  Zigzag or over-lock stitch the very bottom edge of your jean circle.  I adjusted my stitch width to 3 inches in order to save my embroidery.  Then fold it 1/8-1/2″ to the inside and hem.  This will be the bottom hem of your skirt.  If you aren’t trying to save a design like I was you can give yourself a larger hem allowance.

Step 7:  About 1/4″ in. from the upper edge of your jean circle baste a long running stitch all the way around.  To do this simply change the stitch length on your straight stitch to as long as it will go on your machine.  My machine will lengthen this stitch to 5″ inches.  Do a second one 1/4″ in. away from the first one.  Be sure not to lock in or reverse stitch your start and finish on these two seams because you will be using them to create the gathers in your ruffle.


Step 8:tear pattern and put on a dashed line for the ruffle adjustment.  Next pick a patterned fabric to match your pants design or that looks cute with your overalls.  I picked colors to match the accent flowers on the overalls.  Lay the pattern on the fabric and fold it up along the dashed line.  Pin and cut 2 skirt pieces.


Step 9:  Change your thread to match the printed fabric you picked out and cut earlier.    Taking the two skirt pieces place them right sides together and sew a 1/2″ inch seam on each side.  Trim the seam down and sew it again just inside the seam allowance with an over-lock stitch to prevent fraying.  Iron seams  to one side.  If you take care to iron them the opposite direction as the side seams on your overall top they will nest nicely and match well for sewing.  This will lower the overall bulk of the finished seam for you as well.

Step 10:  Repeat step 7 from your jean circle on your printed fabric circle if desired.  This will allow you to lightly gather the skirt panels to make making them to the overall top section easier.  For some reason I needed this for the front section but not the back section.  I was glad I took the time to do it.


Step 11: Match side seams of printed skirt section with overall top section and pin in place from the blue jean side.  I like to use a 3 pin technique which is one pin in the middle of the seam and one pin on each side of the seam.  This keeps the seams solidly aligned.  Pin the rest of the skirt to the overalls gathering your basting line as needed to ease and match the fabric widths.  Change the thread back to match your overalls.  Sew 1/2″ in. seam from the blue jean side as well so you can watch your pocket lining and don’t accidentally sew them into your seam.


Step 12:  Trim the seam down and sew it again just inside the seam allowance with an over-lock stitch to prevent fraying.  Again being careful of your pocket lining.  Pull out basting gathering seams if desired.  I pick it out with a seam ripper from the front and only the sections that show on the right side of the outfit I am working on.  You should have sewn over and hidden most of the basting seam.  I always over-lock stitch jeans because otherwise they continue to fray each time they are worn and washed.

Step 13:  With right sides together match the side skirt seams with two of the ruffle seams and pin using the 3 pin technique again.  Pull one basting string to gather the front and back.  Distribute the gathers evenly until the ruffle fits nicely to the skirt line.  Pin to the skirt edge.

Step 14:  Sew ruffle to skirt with a 5/8″ inch hem.  Trim the seam and over-lock stitch the edges again.  Iron the seam towards the jean ruffle and you are finished.

Pair it with a cute under shirt of your choice and you have a lovely outfit any little girl would love to wear.  Plus you now have a durable pattern to use for next time which will save quite a bit of the work especially if you want to convert overall shorts into a dress.

Friday, June 27, 2014

Superhero Masks - A Kids Obession Turned Creation

Superheroes have really become almost an obsession at our house.  For years now my husband and I have loved going to see these types of movies together, and now that my kids are a little older they have discovered them as well.  Whether it is the cartoon version or the live action they watch superheroes, then they play action figures, and dress-up.  My nine year old daughter has even said that she would like to be Captain America for Halloween this year.  Her six year old brother followed that idea with a request to be Ironman with a "real suit of armor".

As you know I have been designing felt masks for my mother's Etsy Shop: Our Cozy Creations and the superheroes are great sellers.  So we have been trying to branch out and expand our choice selection and I often find myself asking my kids which superheroes they like the best and why.  "The Avengers" are a group that continue to come up time and time again.  Both my girls wishing that they made action figures for the girl superheroes and not just the boys.  So my sister and I have been designing masks for the little girls in our lives that want to be as amazing and super as the little boy's in our lives.


Well the other night I was struggling with my design for Wasp from the Avengers.  You can read about that here.  Starting fresh the following morning I was not only much better at being objective about what I had accomplished the night before but my daughters were also awake and could give me their opinion.  So here it is.  While working on this design I can say I learned more about "The Avengers" comic book characters then I ever thought I needed to know.  And that knowledge has spurred me into action to create one more design so that the original team of five will be complete and available.  This design was taken directly from some of the current cartoon animation my kids watch from time to time right now and is stamped with child approval, my girls especially were thrilled after they saw me add the rhinestones to it.  If you are curious you can check out my inspiration from another artist: MonteCreations on Deviantart here.

Thursday, June 26, 2014

New Leopard Felt Mask Design

I found some time yesterday evening to do a little bit of crafting and design work and I discovered something.  I should stop sewing when I start to get tired.  My first project was a cute leopard mask. which I managed to finish right around 7:30pm after my boys and the baby had gone to bed.  I was on a roll and in the mood to keep designing so I started into another design for Wasp from "The Avengers".  I worked at it and sewed and redesigned and cut felt clear up until about 10:30pm when I was ready to scrap the entire thing and break into tears.  I was exhausted and unhappy with the entire design.

Fortunately I have a very supportive husband who recognized the signs of exhaustion that I was in denial about because I quote: "Just want to get this right".  He convinced me to set it aside and come back to it another day when I am feeling less tired and more fresh.  So here is my new leopard mask design now available at Our Cozy Creations on Etsy.  And Wasp you may ask?  More to come on her when I figure out what needs to change with her design.

So a note to myself and any other crafters who tend to find themselves frustrated late at night while working on a project.  Take a break, get some sleep and start again fresh another day.

Tuesday, June 24, 2014

Receiving Blanket Embroidery: A Gift of Love - A Quick Baby Blanket Tutorial

Today's project is a gift of love.  One of the gifts I was given when my youngest daughter was born was a set of 2 newborn receiving blankets embroidered with a cute teddy bear and her name.  They were given to me with instructions to enjoy finishing off the blankets as I wished since my friend knew I enjoyed crafting.  This little project turned into a great stress reliever for me at a time when I needed it most during recovery.  When I was healthy enough to actually work on finishing these blankets, my daughter had far outgrown the newborn receiving blankets. So, I had to come up with another plan for them.  After a fun trip to the fabric store for some cute coordinating baby flannel fabric,  I got to work.  I wanted a nice large reversible blanket that would work for her for quite a while, so I used the size the ones given to me as my base size.

Prewash your fabric: I always do this for baby projects and anything that will be washed often to pre-shrink it and remove any extra dye from the fabric.

Square up your edges: Use a rotary cutter, cutting mat and quilting rulers.  Then, cut eight squares (two of each fabric) all the same size; mine are 19 1/2" inches by 19 1/2" inches.  You can get this size with 3/4yard of each coordinating flannel.  I already had two squares, so I only needed three other fabrics, but you will need a total of four fabrics to complete this project.

Next, using matching thread, sew your squares together in pairs with a 1/4" inch seam allowance.  This blanket was done with pink and purple together and then gingham and print together.

Pin your pairs of squares together so you now have a four patch and sew.  I like to use a Three Pin Technique.  This technique is used for helping to keep your fabric from moving while lining up points and corners or matching seam lines while sewing.  Iron your seams in opposite directions from each other so they will nest snuggly when pinned.  Then,  you put the first pin directly into the center of the seam with the second and third pin closely placed on either side of the first pin.  Sew up your seams and then iron flat.

Now you should have two large four patch pieces of fabric.  With right sides together, start your edge seams just past the middle on one side and sew all the way around to just short of the middle when you reach that first side again.  I used a 1/4" inch seam allowance again.  When you are finished with each side you should have 5-6" inches of open edge that has not been sewn.

Clip your corners seam allowance at about a 45 degree angle.  This will allow them to lay flat instead of being bulky with extra material when the project is finished.  Then, using that opening turn your project right side out.

Now, iron that open section with the seam allowance neatly folded on the inside and with thread that will blend into the fabric stitch this opening shut.  You can't see it on my blanket because I covered the edges with a decorative stitch.

To finish off this project with a bit of embroidery flare, I chose a variegated thread that went well with the fabrics I picked and then selected a decorative stitch I liked on my machine and stitched it all the way around the edge of the blanket.

And your project is finished!  My finished blanket ended up being approximately 38 1/2"inches square, which is a nice big size. At six months old, she still has plenty of growing room and space to snuggle in it.  It was so nice to have a project I could work on a little bit at a time and rest in between each step while I recovered from surgery.  It really gave me something to focus on besides how painful everything felt and how useless I was feeling because I was on such limited activity.  I can't thank my friend enough for her thoughtful gift that was an answer to an unspoken prayer just for its ability to keep my spirits up while I worked on it.

Monday, June 23, 2014

Those Little Rebels We Call Socks Tamed At Last - Laundry Tips & Organization


As mom's most of us have at least one household chore that we really don't enjoy doing.  For some it's laundry and for others it's cleaning bathrooms.  Lately since laundry is one of the few household chores that I am not medically restricted from, I have discovered that socks have become one of the most frustrating things to deal with.  As a family of seven it often feels like we have a million of these little buggers.

They come off all over the house like shoes typically do and find their way to places I would never imagine they should be.  I have found them on the kitchen counter, in the trash, under the couch, in the bathtub and the toilet (thanks to my four year old).  Plus that is just the dirty ones.  Heaven forbid they actually make it into the hamper where they belong.  Once clean I find them in places like stuffed in the kids closet because they didn't want to put their clothes in their dresser, in my diaper bag, because you never know when someone will need a clean pair with a six month old and a potty trainee.  They even miraculously find their way inside folded sheets to be discovered the next time we put clean ones on someone's bed.  I used to say I was an organized person before I had kids, now I only say I usually find what I need even in the chaos.  And I constantly remind myself:

"To every thing there is a season, and a time to every purpose under the heaven:"
Ecclesiastes 3:1

So it must be organization season this week at my house because I have been working hard to tackle our sock mania and I have come up with a few tricks and tips that I would love to share with you.

1.  Turn Them Right Side Out - I find that washing socks left turned inside out more often then not leaves dirt and bits of grass or whatever stuck to my kids socks.  So I work at turning them right side out a little at a time.  When you pick a pair up to put in the hamper, turn them right side out before tossing them in, when you make the kids who left them pick them up and put them in the laundry remind them to turn them right side out and finally when I am sorting laundry to put in the washer I turn any socks right side out that escaped the process before.  I have found this cuts down on the aggravation that builds up while I am folding laundry because I no longer discover still dirty socks that have to be washed again (I used to call these the perpetual dirty sock) and I don't spend a lot of time all at once doing a very tedious task.

2.  Dresser Drawer Bins - I measured the inside of my kids dressers and bought some plastic tubs that would fit.  They don't need lids because that would make it to much for my kids to deal with.  Just about any open basket or bucket that will fit in the drawer will work nicely.  I like two per kid for the essentials.  Into one goes all those little sock rebels.  As long as they are turned right side out and in the correct kids clothes pile I don't even bother to fold them anymore.  Which saves me time and countless amounts of aggravation.  Into the second bin goes their underwear.  Finally in the left over space they keep little things like tights, belts and ties for dress clothes.  This plastic bin idea works fantastic with baby clothes too.  Since their clothes are smaller I buy smaller bins so more of them fit in the drawer.  I keep one for socks, bibs, hats, hair bows, pacificers & clips, and even those newborn hand mittens and booties  all separated by a bin since they are so tiny they are impossible to fold anyway.

I am finally mature enough to willingly admit that my mom did know something when I was a kid.  I know most teenagers insist that they will never be like their parents when they grow up and often say their parents couldn't possibly understand what they are going through.  Fortunately as I have gotten to be an adult I have realized that this is not the case.  I know without a doubt that my mother understood all too well the constant struggle with socks raising a houseful of girls.  This last tip is directly from her sage wisdom all those years ago when I was young.

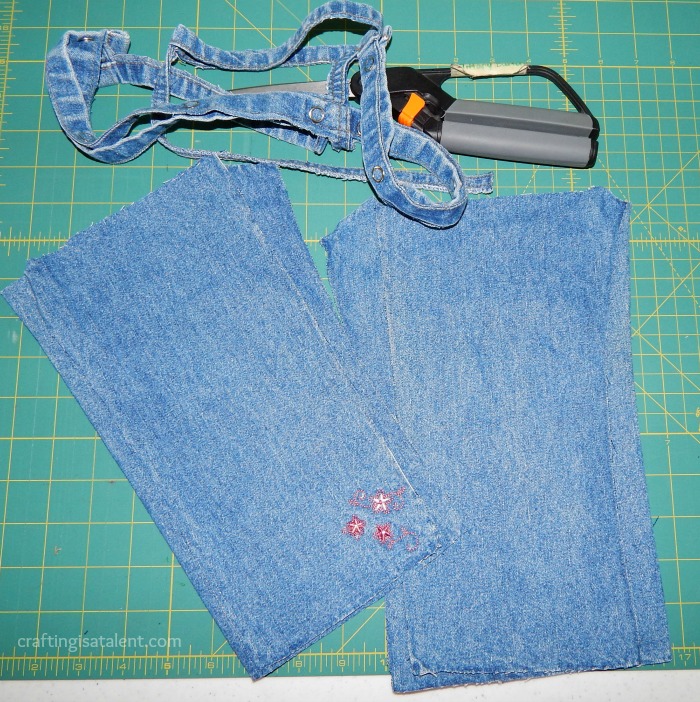
3.  Mark Your Socks - I mark my kids socks so I can tell them apart easily while sorting.  Socks come for a large range of shoe sizes in one bag, and for all of my daughter's lives so far; they have always worn the same size and usually the same style of sock.  The first time I bought two of the exact same packages of socks for my girls I knew I had to do exactly what my mom did to my socks.  You pick a color of sewing thread that will stand out against the color of the sock and you sew a button stitch onto the corner of a toe seam.  This is simply the back and forth stitch used to attach a button to a shirt and it quick and easy to do.  Make sure that you pick one side of the seam either left or right for all your socks and stick to it.  This way you only have to check one spot on every sock you wash and sort.  For those without a sewing machine this could be done by hand with a simple whip stitch but it would definitely take more time.  For my girls since their are only 2 of them I only had to mark one set of socks.  I know the ones without marks go to the other daughter.  And I am now doing this for my boys as well.  So THANK YOU MOM for teaching me by example how to tackle socks and all the other sage advise you gave me throughout the years.


"Behold, mine house is a house of order, saith the Lord God, and not a house of confusion."
Doctrine & Covenants 132:8

It is amazing how much a little bit of order in our socks has simplified my family's life.  No longer do I hear "Mom I don't have any clean socks!"  except maybe on laundry day.  They always know right where they are and they don't disappear in between other folded clothes like shorts and pajamas on their way to the drawer.  Plus even though I don't match and fold their socks anymore they never have trouble finding a match themselves.  Which means one less thing I am doing for them.  YEAH!

The animals in the ark may have come two by two, but the socks in our family go into the bin one by one.  My 9 & 10 year old girls have developed a love for wearing mis-match socks.  Especially to school.  I think this is their way of showing their personality since they have to wear uniforms.  And to them the brighter and more colorful the better.  So often I have socks in the laundry without their match even being dirty.

The laundry issues with socks escaping to the far reaches of the house may never be completely conquered but at least their stress creation is a little bit lower for this mother and maybe for you as well after reading this.  Do you have laundry or clutter tackling tips that you love and work for your family?  I would love to hear them in the comments below.

Thursday, June 19, 2014

Pajama's Made of Fish - Who would have thought? Simplicity # 2481 Pattern Review

Summer seems to be a time of growing.  Every time I look at one of my children they are taller, older and eating more.  This is a timeless issue that leaves all mother's wishing they could pause time and keep their children young.  I admit I am guilty of not only wishing they wouldn't grow so fast, but also wishing they would hurry up and grow out of whichever phase they are in that is straining my patience at the time.  Well as we all know we don't control either of those things, and one of the biggest needs produced by growing is clothes.  Whether it's the new school uniforms I dread buying before school begins in August or their struggles with clothes getting to tight and small or worn out and holey it is a constant battle.

Not too long ago JoAnn fabric and craft stores had their Simplicity sewing patterns on sale for $1.99 each and I couldn't resist investing and buying a ton of patterns in the hopes of making a few of my kids clothes over the next year.  I also hoped maybe I would get to teach my older girls a little more about sewing as well.  My first project was a new set of pajama's for Clarissa since I am constantly catching her wearing her sister's.  This lead me to pick Simplicity Pattern # 2481.

So pajama's made of fish you ask?  Why the strange title of my post today?  Well new pajamas turned out to be quite the little adventure in my house.  Clarissa was so excited about getting to pick out her very own fabric for these homemade pajamas, and she very thoughtfully went through all three of my under the bed rolling totes that I keep fabric in.  As I sat there watching her she oo'ed and ahh'ed as each fabric was brought out and I began to sound like a broken record telling her again and again that my quilting fat quarters weren't big enough to make her anything she could sleep in.  Eventually though she had a stack of fabric to choose from narrowed down that she said she loved.  There was nothing in it that I had expected.  When I think of my girls I still do so in a semi-stereotypical way: pink & purple with ruffles and princesses.  All of which applies less and less to my daughters as they grow older.

Her first choice was not the pink, frilly, or even the bright butterfly fabric I might have expected.  It was fish fabric I had tucked away from more then ten years ago.  I was shocked.  And then not only did she not want to put a pink or red to match to coral on the fabric, she wanted to use bright orange to match the pretty fish.  When I asked her why this fabric she told me because turquoise is my favorite color and I love dolphins.  The only girly thing about her choices were the 2 matching glittery buttons on the front of the shirt.

This particular pattern has several style options available in a single pattern.  Something I have come to appreciate because it means I have more creative options with each one.  Or as my daughter put it: 
 "This is so cool mom, I get to be my own clothing designer."
She choose the style A shirt with the buttons, and the B option to change the fabric on the bottom half.  With the pants she said very emphatically: "NO POCKETS MOM."  Because it had been fabric I had previously used I had various shapes and sizes cut out of it and she was put to work ironing it.  After a bit of creative pinning I managed to find just enough going the right direction to get all the pieces cut out.
Things I loved about this pants pattern:  It is absolutely great for a beginner and Clarissa is in the middle of making a second pair of pants all by herself so my hope that clothes would spark my kids desire to learn worked. Hooray!  Because it is multi-size I was able to easily adjust for her small waist and extra long legs.  My TIP:  It's hard to tell which side is the front and which side is the back without the pocket for orientation so do a one inch satin or zigzag stitch just below the elastic in the back as your last step.  The top will cover it up and you will always know which way to put it on.
Things I loved about this shirt pattern:  I totally love having built in choices like buttons or Velcro, and whether I want two different fabrics or to have it all be the same.  I also love that the neckline is finished with bias tape.  I always struggle with neck lining and interfacing and the bias tape is quick, easy and looks great.  Things that need to be fixed about this shirt pattern:  Step 5 should say inside instead of outside because you are pressing the edge of the bias tape toward the center of what will be the inside when it is finished.  It was a bit confusing at first.  My Tip:  For the last two steps 16 & 17 hemming the sleeves and bottom edge zigzag stitch the very edge and set you stitch width to the 1/4 inch they say to press.  This will give you automatic fray prevention and a fold line so you can skip ironing those teeny tiny edges and possibly your fingers.  I figured this out the hard way.
There are a couple things I think you could do to further modify the style of this pattern.  First put pockets on both sides of the pants instead or just one or not at all.  In the pattern they have the pockets match the pants fabric.  I think they would have looked really cute in orange on her outfit to match the solid color in the top.  Also you could easily shorten the sleeve length for a short sleeve pajama and the pant leg length and turn them into shorts.  Overall I give this pattern 4 out of 5 stars because even with the little bit of confusion on the bias tape it is super versatile and has tons of styling options.

Wednesday, June 18, 2014

Insomnia a Chance to Reflect

Ever since my three month stint in the hospital last year with pregnancy complications I have suffered from really bad insomnia.  As I am sure many others have suffered with this issue for various reasons before me and will continue to after me it has caused me to take time and reflect in the wee small hours this morning.

I would have called my day yesterday a failure and said that I actually managed to accomplish nothing.  Not a single task was completed as far as I was concerned when I crawled into bed last night in my first attempt to sleep.  But then my husband with his constant loving humor started cracking jokes and reminding me that I was not allowed to beat myself up, I already had been by ongoing health issues.  So he tried to point out that I had accomplished more then I was giving myself credit for.

First, all my children were alive, well fed, and had clean clothes.  Is this an accomplishment when it is something I do out of love for them even on the days that I feel at my worst and isn't something I consciously think about because it is second nature?  I am not so sure.

Next, I pointed out that I had attempted to do laundry today and it wasn't finished.  His response was but your daughters willing worked on it today without complaint and you washed and dried six whole loads.  That is something.  Immediately my rebuttal was but they aren't folded or put away so it isn't complete right?  This was the nugget of wisdom gleaned from this for me:  "Tiffany" he said "laundry is an unending cycle so it must be counted each step along the way."

Then he asked me a question:  "Why do you refuse to take credit for all the good things you do?"  Selfishly I wanted to continue my little pity party and so I said very determinedly "because after 34 years it's a very ingrained habit so why change now?"  Well the joke is on me because he responded as he often does with things like:

I've braided my nose hair for the last 34 years, why stop now?
I'm in the habit of snoring when I sleep so why change now?
I love to shave my back hair into patches like a chess board why change now?
I've done cocaine for the last 34 years why change now?
I've smoked all my life it's too late to change now.

As we laughed over the silliness and absurdity of all these statements, because they would never apply to my husband at any time in his life I began to understand his point.  Just because something is a habit or you have always done something a certain way, doesn't mean it's right or even that good for you.  It is so easy to be over critical of yourself and not remember the good you do at the end of the day, because so often we simply live in the moment and at that moment I was tired and hungry and hurting.  But it reminded me of a song by Hilary Weeks called "All The Good"

"While my weaknesses all shine
And I forget
Until He patiently reminds me
I forget about
 The good things I've done
The kind words I said
The tiny victories that no one sees
And the changes I've made
And when the count comes in
As I'm adding up the day
In the midst of the "coulds" and "shoulds"
Help me remember
All the good"
 
So I reflect this morning on the good I need to remember from yesterday:
  • I snuggled with my six month old daughter
  • I helped my daughters learn how to happily work hard as we washed and dried six loads of laundry
  • I helped lovingly direct my kids cleaning efforts so they could be done with their bedrooms in time to go swimming with their dad
  • I patiently helped my daughter sew her own superhero mask even when she interrupted my attempt to finish a dress as soon as her sister went to sleep for her morning nap
  • I remembered to make lunch for myself and eat it (trust me this is an accomplishment)
  • I allowed my daughter to learn and develop her skills in the kitchen and cook lunch even though it would have been faster if I had done it myself
 
Did I develop talents yesterday?  I sure hope so.

Sunday, June 15, 2014

The Minion in ME - Despicable Me Minion Felt Mask Design

This week has been what I would have considered a slow week as far as creativity goes.  Between doctor appointments and therapy for my son Jeremiah and my husband being out of town on business for a couple of days, I have felt like I was dragging.  But as I have looked over my week I realize that I accomplished more then I thought I did.

Friday morning we went as a family to the kids summer movie program in our area and watched "Despicable Me 2".  It's a cute movie all four of my older kids loved.  The little minions in both the Despicable Me movies have become quite the phenomenon.  And I have to admit that even I think they are pretty funny.  This movie prompted my inner designer to step forward and demand some attention.

So while my mother was over and we were sewing in the afternoon, I set to work designing some very cute minion felt masks for the Etsy Shop: Our Cozy Creations.  I started with the normal goggle eye minion, because figuring out where to put eye holes for the kids was pretty easy.  And not wanting the girls to feel left out I came up with a way to make both little girl and little boy minions by adding eyelashes and a cute hair bow.

Then I started on the single eye goggle minions.  This was a bit trickier since I didn't want to ruin the look and shape of the minion, but the person wearing the mask still needed to be able to see.  I was never able to figure out how to put on eyelashes that would actually look cute on a one eyed minion, but I think they turned out pretty cute anyway.  So this is what I managed to actually accomplish this week with a little sewing help from my mother since she made up the shop samples after I drafted the pattern.  Coming soon:  Purple minion masks.  I am really excited about these because all that crazy hair is just going to be fun.