
Have you ever purchased an outfit for your kids that you thought would just look the cutest on them only to find that it was defective or they only got to wear it once or twice before they outgrew it? I seem to have this problem with overalls quite often. So much so that I pretty much quit buying them for my kids until now. My oldest daughter who is now ten by the way, received the cutest outfit with overalls when she was a baby, that I could never quite bring myself to part with, even though it was defective. The little snaps up and down the inside of the legs to make diaper changes easy never stayed closed properly. Every time she wore these cute pants the legs opened after less than 30 seconds of wear time. So I tucked them into my mending pile and promised myself I would figure out how to fix them someday. Well, she outgrew them and her sister missed out on them completely and the years passed as they got pushed aside again and again every time I tackled my mending pile.
Now that my youngest and last little girl has arrived and is growing so quickly I realize that it is now or never for these cute little overalls. The inspiration for this project came from my sister-in-law Meggan who gave my older girls up-cycled dresses similar to this a couple of years ago. Remembering those outfits gave me the idea I needed to pass along this little DIY sewing tutorial to you.
Supplies You’ll Need:
1 pair of overalls either shorts or pants will work
cotton/blend print fabric to match your overalls design if it has any (I tried to match the embroidery colors and design on mine)
cutting mat, ruler and rotary cutter
matching thread
jeans sewing needle 80/12 size
Pellon 806 Stitch-N-Tear 20″ wide – White
pencil and sharpie marker
general sewing supplies

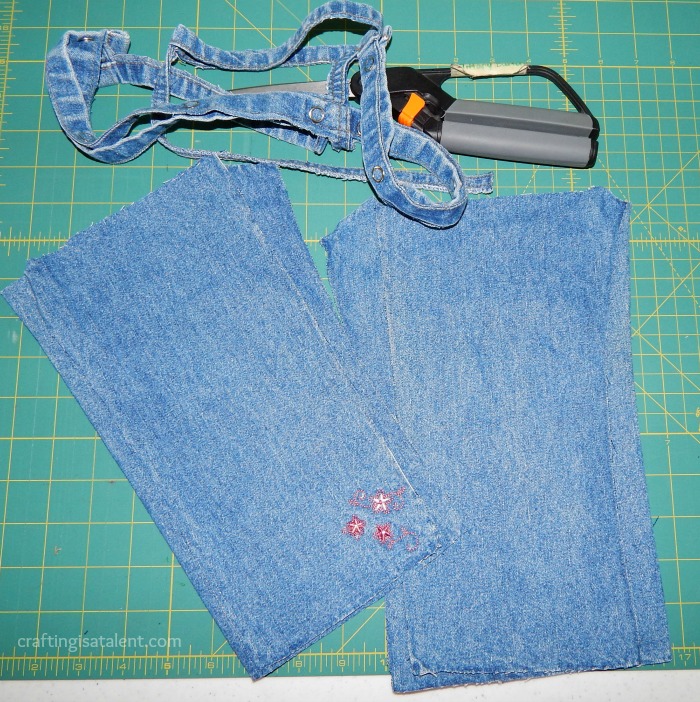
Step 1: Fold your overalls in half and cut carefully with a rotary cutter. I cut my pair low enough to save the fancy pocket design and the inner pockets themselves.

Step 2: Lay flat and trim any uneven spots off.


Step 3: Lay out your stitch-n-tear panel. I buy mine by the yard so I have it large enough to make pattern pieces with, it’s fairly inexpensive and holds up better than the tissue that comes in normal patterns. If it has issues laying flat for you, iron it to remove any folds, bends and wrinkles. Unfold and lay your pant legs flat on your stitch-n-tear panel. Then outline the pants with a pencil. Add a 1/2″ seam allowance to both sides of the outline and go over the pencil lines with a black sharpie.

Step 4: Cut the seams off the legs you just removed and straighten them. I cut mine to 4in. x 11in. I did this so I could add a cute ruffle to the bottom of the dress and so I could save the matching embroidery design from the pant leg. If you don’t want a ruffle this step and step five could be skipped. I wanted to save the cute little flowers embroidered at the bottom of the pant legs.


Step 5: Sew the leg sections end to end until you have a nice jean circle with a thread color matching the jeans as well as you can. I use a jeans needle for this entire project. They are excellent at getting through the thicker fabric and will save your project and your sewing needles from breakage and frustration. Sew with an over-lock seam along the edge to prevent fraying. The over-lock stitch is number eight on my machine I have a picture of it for you so you know what the stitch looks like. Press seams to one side.


Step 6: Zigzag or over-lock stitch the very bottom edge of your jean circle. I adjusted my stitch width to 3 inches in order to save my embroidery. Then fold it 1/8-1/2″ to the inside and hem. This will be the bottom hem of your skirt. If you aren’t trying to save a design like I was you can give yourself a larger hem allowance.

Step 7: About 1/4″ in. from the upper edge of your jean circle baste a long running stitch all the way around. To do this simply change the stitch length on your straight stitch to as long as it will go on your machine. My machine will lengthen this stitch to 5″ inches. Do a second one 1/4″ in. away from the first one. Be sure not to lock in or reverse stitch your start and finish on these two seams because you will be using them to create the gathers in your ruffle.


Step 8:tear pattern and put on a dashed line for the ruffle adjustment. Next pick a patterned fabric to match your pants design or that looks cute with your overalls. I picked colors to match the accent flowers on the overalls. Lay the pattern on the fabric and fold it up along the dashed line. Pin and cut 2 skirt pieces.


Step 9: Change your thread to match the printed fabric you picked out and cut earlier. Taking the two skirt pieces place them right sides together and sew a 1/2″ inch seam on each side. Trim the seam down and sew it again just inside the seam allowance with an over-lock stitch to prevent fraying. Iron seams to one side. If you take care to iron them the opposite direction as the side seams on your overall top they will nest nicely and match well for sewing. This will lower the overall bulk of the finished seam for you as well.
Step 10: Repeat step 7 from your jean circle on your printed fabric circle if desired. This will allow you to lightly gather the skirt panels to make making them to the overall top section easier. For some reason I needed this for the front section but not the back section. I was glad I took the time to do it.


Step 11: Match side seams of printed skirt section with overall top section and pin in place from the blue jean side. I like to use a 3 pin technique which is one pin in the middle of the seam and one pin on each side of the seam. This keeps the seams solidly aligned. Pin the rest of the skirt to the overalls gathering your basting line as needed to ease and match the fabric widths. Change the thread back to match your overalls. Sew 1/2″ in. seam from the blue jean side as well so you can watch your pocket lining and don’t accidentally sew them into your seam.


Step 12: Trim the seam down and sew it again just inside the seam allowance with an over-lock stitch to prevent fraying. Again being careful of your pocket lining. Pull out basting gathering seams if desired. I pick it out with a seam ripper from the front and only the sections that show on the right side of the outfit I am working on. You should have sewn over and hidden most of the basting seam. I always over-lock stitch jeans because otherwise they continue to fray each time they are worn and washed.

Step 13: With right sides together match the side skirt seams with two of the ruffle seams and pin using the 3 pin technique again. Pull one basting string to gather the front and back. Distribute the gathers evenly until the ruffle fits nicely to the skirt line. Pin to the skirt edge.

Step 14: Sew ruffle to skirt with a 5/8″ inch hem. Trim the seam and over-lock stitch the edges again. Iron the seam towards the jean ruffle and you are finished.

Pair it with a cute under shirt of your choice and you have a lovely outfit any little girl would love to wear. Plus you now have a durable pattern to use for next time which will save quite a bit of the work especially if you want to convert overall shorts into a dress.
No comments:
Post a Comment